How does the Route Planner work?
Plan your perfect route with just a few clicks. Choose your activity and set the individual waypoints directly on the map. Or simply enter the start and finish points and let our planner calculate the best route for you!
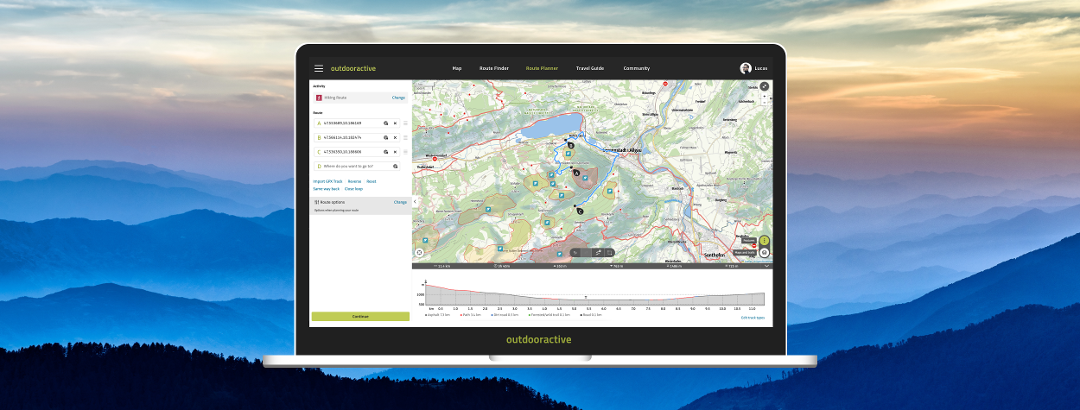
The Outdooractive Route Planner
With the Outdooractive Route Planner, your idea instantly turns into a real adventure – intuitive, fast, and tailored just for you. Whether it’s a spontaneous family walk in the afternoon or a summit route on your upcoming vacation, you can plan it all here with ease.
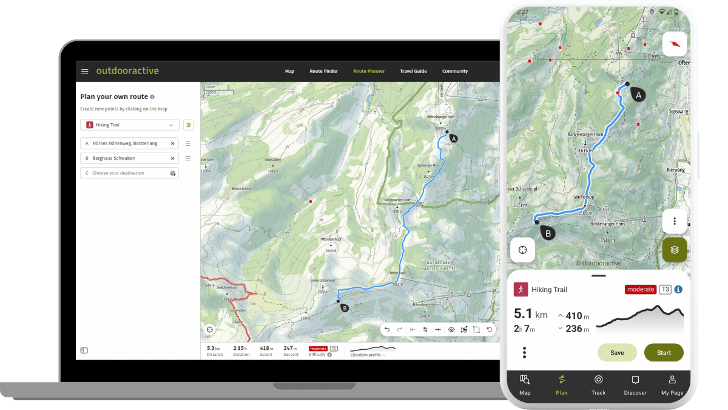
Simply set your starting point, destination, and stops along the way, and the perfect route for your activity appears – whether you’re hiking, biking, or heading into the mountains. Distance, duration, difficulty, and elevation profile are displayed right away, so you can prepare your route with confidence. Every section can be adjusted, moved, or expanded – turning planning into real anticipation. You can also upload existing GPX tracks, edit them, and sync seamlessly with your app or GPS device.
Even with the Basic version, you can plan your ideal route from A to B – customized to your chosen activity, difficulty level, trail type, and slope. That way, you’ll always find the path that fits you best.
With Pro, you get access to exclusive maps, different map styles, trail networks, and handy extra layers, such as Aspect and the ATHM for avalanches. Plus, you can save your routes offline and stay on track even without an internet connection.
Pro+ gives you the complete package: with current snow data and the snow depth map, you’ll be well prepared for winter routes and stay oriented even in deep snow. It also includes official routes, plus weather and avalanche information right on the map – for maximum safety and even more precise planning.
Every waypoint brings you one step closer to your next adventure – whether it’s a quick afternoon route or a big summit climb.
Start planning your route
First, choose an activity (e.g., hiking, biking, etc.). Based on your activity, we’ll determine the best route between your waypoints. In doing so, we take into account the trail network, surface types, and any closures or obstacles along the way. The estimated duration will also depend on your chosen activity.
Once you’ve set two points, the route length, estimated time, elevation gain and loss, and the difficulty level are displayed below the map.
You’ll find the Route Planner in the main menu at the top of the page. Once you’ve selected your activity, there are several ways to start planning your route:
- Interact with the map: Click on the map to set your starting point and create your route step by step. You can add waypoints by clicking anywhere on the map or map icons. Drag and drop waypoints to move them around. Right‑click on the route to insert a new waypoint, or right‑click on a point to delete it.
- Search: Can’t find your starting or destination point on the map? Use the search bars in the waypoint list. Enter a place or address, then choose from the suggested results to add it. Point names are automatically assigned. To add waypoints, use the last input field in the list. Rearrange points by dragging the three stacked bars, or remove one with the “x.”
- Round Trip Planner: Use this button to create a loop route starting from your chosen point. Simply set the amount of time you’d like the route to take, and we’ll generate suggestions automatically.
- Import a GPX file: Click “Import” to upload a GPX file. The GPX route will appear in the Route Planner and can be edited as needed.
The Route Planner is set up the same way on both iOS and Android.
Hit the main menu, click on “Plan” to access the Route Planner. Once you’ve selected your activity, we offer several ways to start planning:
- Interact with the map: Set your starting point and the rest of your route by pressing and holding on the map. You can add as many points as you like the same way. Tap a map symbol to add it to your route. Press and drag to move individual points. To insert a new waypoint, tap on the route and select “Insert intermediate point.” Tapping on an existing point brings up different options, such as deleting it.
- Search: Can’t find your start or end point on the map? Use the search function in the text fields below your activity. Search directly for a place or address for your starting point or destination. Select one of the automatically suggested results and it will be added to your route. Point names are generated automatically. Once you’ve added two points, you can search for more points or waypoints in the point list, change their order, or delete individual ones.
- Import a GPX file: Use the “Import” button to upload a GPX file. The route will then appear in the Route Planner, and you can edit it further as needed.

More safety for your outdoor sport: The more precise the information on the difficulty, terrain and character of a ...
Making use of the elevation profile and the way types
For every route you plan, you’ll always see at least a simplified elevation profile. In the detailed view, you have access to the full functionality and different modes of the elevation profile while planning. The elevation profile updates automatically as you plan, along with the information on distance, duration, elevation gain, and the difficulty of your route.
Click on the preview of the elevation profile to jump into the detailed view. Just like that, you'll always have an eye on all your route's details.
Discover all the features and modes of the elevation profile right here:
A unique feature on the web: manually selecting the track type.
If the trail types aren’t displayed but you already know them, you can enter them manually. To do so, use the “Edit track types” button on the right side of the elevation profile.
First, select the track type you want, then click on the section of the elevation profile where you’d like to apply it. Don’t forget to save your changes!
The information on the condition of paths (e.g. width, surface, traffic) is translated into a meaningful path type.
The point list during route planning
The point list is your alternative to the map view. This list view is a tool for precise route planning. It shows all points of your route in the order you’ve set and makes it easy to add, adjust, and rearrange individual points. Each point is assigned a letter from A–Z in alphabetical order. After Z, the sequence continues again from A. If you change the order of points, the letters of the affected points will update accordingly. The pins for each point on the map display the same letter as in the point list.
On the web, you’ll find the point list in the Route Planner on the left side. You can collapse the entire sidebar to get a larger view of the map.
You can change the order of points at any time via drag & drop using the three-bar icon. To remove a point, simply click the “x” next to its entry.
If you want to edit a point or add one at the end of the route, use the text field for that point to search for the desired location. You can also enter coordinates from supported coordinate systems into the search. Point names are generated automatically.
Once you’ve selected two points for your planning, the planning panel in the lower half of the screen will display the route data, the difficulty level, and a preview image of the elevation profile. To access the point list, drag the planning panel upward. In the full view, the gray-highlighted section gives you access to the point list, with the route options and the current weather forecast for your route located directly below it.
You can reorder points in the list anytime by drag & drop using the three-bar icon. To remove a point, simply click the “x” next to it.
You can also search for places using the text search or the voice function by clicking into a point’s input field. You can choose your current location or reuse previous search results as well. It’s also possible to enter coordinates from supported coordinate systems into the search. Point names are generated automatically.
Pinpoint exact locations based on data from international (DD, DMS, UTM, w3w) and national systems (OS Grid, Swiss ...
Features during route planning
You can use several useful functions to help you edit your route.
Description of symbols from left to right
If you want to change your route afterward, you can move individual points. By left- or right-clicking a point, you’ll open different options to interact with it.
Click directly on the route to insert a waypoint, which you can then drag anywhere you like. You can also do this in one step: when you hover over the route and a black dot appears, simply hold and drag with your mouse—when you release the button, a waypoint will be placed at that spot.
By clicking on the route between two points, you can either connect the points directly or snap free-drawn segments
back to the trail network.
Zoom in and out of the map using the “+” and “–” buttons in the top right corner, your mouse wheel, or your laptop’s touchpad.
Switch to full-screen mode for a clearer view by collapsing the left-side waypoint list using the button at the bottom left.
To move the map, click and hold the left mouse button while dragging.
On the web, the toolbar with all editing tools is located at the bottom of the map (see image below).
Undo: Reverts your last action.
Redo: Restores the last undone action.
Back to start: Once you’ve placed at least three points, this tool connects your route from the last point back to the starting point, creating a loop.
Reverse: Flips the direction of your route—your starting point becomes the endpoint, and vice versa.
Same way back: This function creates a return along the exact same path. Note: in some cases, like one-way streets, detours may occur.
Show/Hide route & content: For better map visibility, you can hide the route and other activated content. Click again to make them visible.
Follow Paths: Choose whether the route between your points follows the road network or runs as a straight line (“air line”). Straight lines appear dashed. You can also mix both options—useful if no path exists between two points.
Edit multiple points: Use the selection tool to highlight several points at once and delete them. Drag a rectangle across the map to select, or click “Select all points” in the bottom right. Click anywhere on the map or “Done” to exit this mode.
Reset: Clears your entire route so you can start fresh.
You can zoom in on the map by pinching in or out with your fingers. Double-tapping the map will also zoom in.
To switch to full-screen view, tap once on the map – this hides the route planning options. Tap again on the map to bring back all editing tools.
Move the map by dragging it with your finger.
To remove a point, simply select the point and click on "Delete". You can also long-press a point and drag it across the map to reposition it.
The trail networks, including the official trails and difficulties for hiking, cycling, mountain biking, winter sports, and horseback riding, are no longer activated automatically. You can find them under the “Maps and layers” button at the bottom right of the map.
In the app, you’ll find editing functions in the 3-dot menu in the left corner below the route details.
Add point: Use “Add point” to open the search function, where you can look up a specific place or address. Once you select a place, it will automatically be added to the end of your route.
Back to start: After adding at least three points, the “Return to start” option lets you create a loop by routing you from your last point back to your starting point.
Reverse: This button flips your route so that the start becomes the destination and vice versa.
Same way back: With this feature, you can plan the return along the same path back to your starting point. Keep in mind that slight differences may occur, for example with one-way streets that can only be used in one direction.
Hide/Show route & content: To get a clearer view of the map, you can hide your route and other active layers. Click the button again to display your route once more.
Turn “Follow paths” off/on: This option lets you decide whether the route should follow the trail network or be drawn as a straight line. You can even mix both options—perfect when there’s no path between two points.
“Follow paths” is enabled by default. If you change this setting, it will only apply after you set the next point. If you want to plan the first route segment as a straight line, long‑press the route between Point A and Point B and select “Connect points directly.”
Reset: The “Reset” function clears the entire planning so you can start fresh with a new route.
Route Planning options and map configuration
Depending on your subscription, different maps, map styles, trail networks, and additional layers are available for Route Planning.
The activity you select (or later change) directly affects your route and automatically adjusts it. Different activities prioritize different types of paths and use an appropriate average speed for calculations. As a result, both the estimated duration and total distance of the route will change.
Changing the activity during planning does not move your existing points, but the route segments between them are recalculated based on the new activity’s trail network. This also updates the duration, distance, and elevation gain.
Switching to a different map does not change the position of your existing points or the route between them, but it does influence the calculation of any new segments you add afterward.
Use the “Map layers” button in the bottom right corner to select your preferred map and style. You can also enable trail networks and additional layers here.
By tapping the 3-dot button in the bottom right corner of the map, you’ll get access to more content and features such as MyMap, BuddyBeacon, or the Audio Guide.
Route options: Next to the activity selection, you’ll find an icon that lets you customize individual route options.
In the bottom right corner of the map, you’ll find the map layer button, which lets you adjust the base map and toggle additional layers.
The 3-dot button gives you access to extra features such as Audio Guide, MyMap, Skyline, and BuddyBeacon.
Route options: You can find route options in the extended planning panel.
Find out more about the Route Planner by clicking the link below:
Good to know
- Route planning is not possible with offline maps. Routing requires current data provided through our system, so you need an active internet connection (either mobile data or Wi-Fi). Make sure you’re connected before editing or creating a new route.
- Editing a route also includes replanning it. All features of the Route Planner are available during this process.
- You can turn a plan into a route. Routes can be published and enriched with photos, videos, detailed data, and descriptions. Published routes also allow interaction with other users through comments, ratings, or questions.
- Leaving without saving: In the web version, if you leave the Route Planner without saving, you’ll be notified that the plan will be deleted. In the app, unfinished planning is kept until you either log out of the app or close it.
- Use MyMap. This feature lets you display similar routes, plans, or personal tracks in the background of your planning.
- Plan a similar route. With the “Plan similar route” function, you can easily duplicate your own route (or another user’s) and then customize it in editing mode.
- Add waypoint details. You can add extra information to a point by creating a waypoint with a name, description, and one of four symbols to choose from.